Photos Colour and Colourised Photos of WW2 & earlier conflicts

British-Army-Sherman-tank.jpg


"A British Army Sherman tank crewman finds the mud heavy going in Germany, 24 November 1944." (IWM caption)

(Photo source - © IWM B 12044)
Malindine E G (Capt)
No. 5 Army Film & Photographic Unit
 
captured-early-production-M4-A1-Sherman.jpg


A captured, early production, M4A1 Sherman tank named "War Daddy II" and an M3 Lee tank during field tests by 1./Komp. Panzer Abt. 501 at the Kummersdorf proving ground 1943

This Sherman with DV ports and the stubby mantlet, belonged to Company 'G' of the 3rd Battalion, 1st Armored Regiment of the 1st Armored Division, and was captured in Tunisia that year.
The 1st Armored was notable for its mailed fist-and-lightning bolt insignia on the glacis plate, they used a system of vertical, diagonal, and horizontal bars and triangles with squares and pips to denote units.

Note the armor thickness and angle stenciled on the tank, as the Germans were giving it an extensive workout during their testing.
The Germans praised certain qualities of the Sherman, calling it a good "running" tank, "embodying a type of strategy that is conceived in terms of movement.

The Germans happily used any Shermans they captured, and unlike the T-34 they didn’t feel the need to modify the tank in any way. They also liked to use the captured Shermans as ARVs, often with the turrets removed. Having a very tough powertrain and a reliable and robust motor is a very nice thing in an Armored Recovery Vehicle.

“War Daddy II" (25816/USA 3067641) was one of 134 M4A1 Shermans built by Lima Locomotive Works in July 1942.
 
Fought from November 20-23, 1943, Tarawa was the first U.S. amphibious operation that was seriously opposed by the Japanese. The price was steep for the Marines of the 2nd Marine Division, who were given the task to seize Tarawa atoll, primarily the main island of Betio, with its airfield. Out of the assault force of 18,000 Marines, nearly 1,000 Marines were killed seizing the atoll. Of the Japanese garrison of around 4,000, only one Japanese officer, 16 enlisted men, and 129 Korean laborers survived to be captured. Tarawa provided the U.S. Marines Corps some hard-earned lessons that they applied to future amphibious operations.

U-S-Marines-Corps-Tarawa001.jpg
Marines landing under fire, Betio Island, Tarawa Atoll, November 20, 1943.

U-S-Marines-Corps-Tarawa002.jpg
US Marines of the Second Division storming the beachhead at Tarawa, November 1943; Marine Mike Segal is looking back over his shoulder.
20 November 1943

U-S-Marines-Corps-Tarawa003.jpg
Red Beach, Bieto, Tarawa. 2nd day of battle.

U-S-Marines-Corps-Tarawa004.jpg
US Marines storm Betio Island, Tarawa Atoll, Gilbert Islands.
22 November 1943


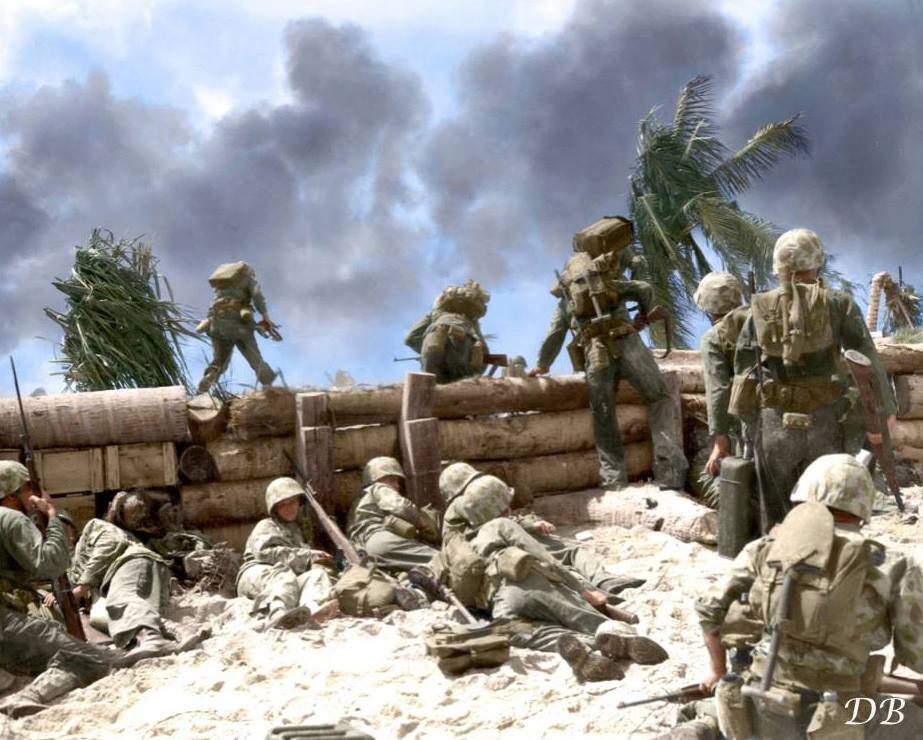
The only Medal of Honor recipient to be photographed during the action for which he received the medal.

US Marine 1st Lieutenant Sandy Bonnyman was appointed Executive Officer of the 2nd Battalion, 8th Marines' Shore Party for the Tarawa attack.

Sandy Bonnyman was also the first and, to this day, the only Medal of Honor recipient to be photographed during the action for which he received the medal. The photo shows the emplacement being stormed by the Marines led by Bonnyman who is standing at the center right, silhouetted by the smoke, on top of the bunker; he is the Marine furthest advanced in the picture.

The photo was taken by Corporal Obie Newcomb, a Marine Corps photographer who, according to an article by Joseph M Horodyski in WWII History Magazine, "quickly realized he was in the presence of someone unusual and decided to follow the lieutenant's assault with his camera".

Sandy Bonnyman's Medal of Honor Citation tells of his actions during the battle when he led the attack on the largest fortified strongpoint on the island:

Acting on his own initiative when assault troops were pinned down at the far end of Betio Pier by the overwhelming fire of Japanese shore batteries, 1st Lt. Bonnyman repeatedly defied the blasting fury of the enemy bombardment to organize and lead the besieged men over the long, open pier to the beach and then, voluntarily obtaining flame throwers and demolitions, organized his pioneer shore party into assault demolitionists and directed the blowing of several hostile installations before the close of D-day.

Determined to effect an opening in the enemy's strongly organized defense line the following day, he voluntarily crawled approximately 40 yards forward of our lines and placed demolitions in the entrance of a large Japanese emplacement as the initial move in his planned attack against the heavily garrisoned, bombproof installation which was stubbornly resisting despite the destruction early in the action of a large number of Japanese who had been inflicting heavy casualties on our forces and holding up our advance.

Withdrawing only to replenish his ammunition, he led his men in a renewed assault, fearlessly exposing himself to the merciless slash of hostile fire as he stormed the formidable bastion, directed the placement of demolition charges in both entrances and seized the top of the bombproof position, flushing more than 100 of the enemy who were instantly cut down, and effecting the annihilation of approximately 150 troops inside the emplacement. Assailed by additional Japanese after he had gained his objective, he made a heroic stand on the edge of the structure, defending his strategic position with indomitable determination in the face of the desperate charge and killing 3 of the enemy before he fell, mortally wounded.

By his dauntless fighting spirit, unrelenting aggressiveness and forceful leadership throughout 3 days of unremitting, violent battle, 1st Lt. Bonnyman had inspired his men to heroic effort, enabling them to beat off the counterattack and break the back of hostile resistance in that sector for an immediate gain of 400 yards with no further casualties to our forces in this zone.

He gallantly gave his life for his country.
 
NATALYA-MEKLIN-KRATSOVA.jpg


NATALYA MEKLIN-KRATSOVA, Lieutenant of the VVS (Soviet Military Air Force), 982 night bomber missions during the "Great Patriotic War", Heroine of the Soviet Union, personally decorated by Marshal Konstantin Rokossovsky. A “Witch of the Night”
 
US-NAVY-Kennedy.jpg


US NAVY John F. Kennedy Frigate Lieutenant

With the rank of frigate lieutenant, Kennedy was assigned in 1943 to the Torpedo Boat Squadron Two, with a seat in the Solomon Islands. He was awarded the command of the Elco PT-109 type torpedo boat, with a wide variety of torpedoes, heavy machine guns and depth loads. Soon Kennedy and his crew of eleven sailors were carrying out night attacks against Japanese barge traffic that were frantically trying to replenish their isolated garrisons in New Georgia.
 
CHICAS-DEL-ATS.jpg


The Auxiliary Territorial Service (ATS) was established on September 9, 1938, organized along the same lines as the Territorial Army. Since April 1941, enlisted women were granted full military status and, in the following months, legislation was passed that guaranteed a similar military regime for official women regarding their male counterparts.

The ATS served in most war theaters, as well as in places like Washington and the Caribbean. The variety of jobs ranged from administrative tasks, through technical jobs and, at the operational end, many of the women served with the Anti-Aircraft Command, although never (at least officially!) Operated the anti-aircraft guns. At its height in June 1943, 210,308 officers and auxiliaries were serving with the ATS.

After the end of the war, it was decided that a small voluntary female force should be retained as part of the regular army, the Women’s Royal Army Corps being established on February 1, 1949. This was dissolved in 1992, with many of its troops transferred to the Adjutant General’s Corps or, simply, to another place in the Royal Army.

In the photo, an ATS Body Lance serves as an observer in an anti-aircraft artillery position. Dressed in the Pattern 37 uniform and woolen gloves, protected with MKII steel helmet (or MKI *) and MKVII gas mask, scrutinize the sky in search of Jerrys with the help of his binoculars.

The artillery piece is the 3.7-inch anti-aircraft gun. The 3.7-inch QF was Britain's main heavy anti-aircraft weapon and the Commonwealth during World War II. It was a piece similar to the German 88 mm FlaK gun, but with a slightly larger caliber of 94 mm. Designed by Vickers, its production began in 1937 and was used throughout the Second War in all theaters, except the Eastern Front.
 
Carovilli, Molise, Italy. November 26 1943

77414111_2427358050727306_4260103358536220672_n.png


"Canadian Sergeant F.H.J. Ricketts examining railway ties which were cut by the last German train through Carovilli, Italy, 26 November 1943.

The German contraption that did the damage was a railroad plough Schienenwolf ("rail wolf") or Schwellenpflug ("sleepers plough")

Contributed by: Courtesy of Lieut. F. G. Whitcome/ Canada. Dept. of National Defence/ Library and Archives Canada/ PA-206523
(Colour by RJM)
 
Just trying to understand in my head what this woman must have gone through?, utmost respect and admiration.
A beautiful woman with amazingly piercing eyes.
 
USAAF-Squadron-381-B-17.jpg


This in a sequence of 4 shots showing the 91st BG in support of the 381st, on the mission during the thaw of March 18, 1944, to Oberfaffenhofen, taken 24,000 feet.

The closest B-17 G (although all brands are out of shot in this particular image) is DF-Z, 'Just Llano Solitario', of the 324th Bomb Squadron, 91st Bomb Group. This veteran plane was going to be lost, the entire crew lost a couple of months later, on May 30, when the flak pulled out two engines, and all radio contact was lost. EMRP 5355.

The plane that shows just ahead of everyone else in this shot is B-17 G 42-31580 'Happy Widow' OA, of the 323rd BS, of the 91st BG, and this plane would also get lost at the beginning of May of that year, on a mission to Berlin on 7 7 crew members became POWS and two were KIA. EMRP 4579.

Tucked right behind it is the very famous B-17 G of the 91st BG-323st BS, called '909, O-R, which would go on to survive the war And complete an extraordinary 140 missions by the end of the wars!

Unfortunately, all the first aircraft in the image, which appear to be divided between 534º and 535º BS, are only partially identifiable by their unit designation letters. All serial numbers are out of focus to be more specific than that. However, the 6 in the middle image are (in their 3 s, from front to back) GD-N, GD-J, GD-K, a GD-M, GD-B and GD-P.

** With the wonderful help of Chris Tennet, the previous aircraft have been identified for this period of time as:

GD-K is 42-37754 "what"
GD-J is 42-38159 "Colonel Bub"
GD-N is 42-31497 "Round trip Jeannie"
GD-B is 42-97214 "Queen Carolina"
GP-P is 42-97174 "Joanne"
GB-M is 42-38009 (no name)

'Carolina Queen' and 'Joanne' are both NMF.

Photo: 91 er BGMA. Via Stewart Evans
 
MK-brit-nico.jpg


A British MK 1 (later model) the 'cross' tank passes a German Pzkw MK IV tank during the "Operation Crusader" November 1941.

Operation Crusader (18 November – 30 December 1941) was a military operation during the Second World War by the British Eighth Army with Allied contingents, against the Axis forces in North Africa commanded by Generalleutnant Erwin Rommel. The operation was intended to by-pass Axis defences on the Egyptian–Libyan fronter, defeat the Axis armoured forces and relieve the 1941 Siege of Tobruk.

On 18 November 1941, the Eighth Army launched a surprise attack. The British armoured force became dispersed and suffered 530 tank losses against Axis losses of about 100 tanks up to 22 November. On 23 November the 5th South African Brigade was destroyed at Sidi Rezegh, while inflicting many German tank casualties. On 24 November Rommel ordered the "dash to the wire", causing chaos in the British rear echelons but allowing the British armoured forces to recover. On 27 November the New Zealanders reached the Tobruk garrison, relieving the siege.

The battle continued into December, when supply shortages forced Rommel to narrow his front and shorten his lines of communication. On 7 December 1941 Rommel withdrew the Axis forces to the Gazala position and on 15 December ordered a withdrawal to El Agheila. The 2nd South African Division captured Bardia on 2 January 1942, Sollum on 12 January and the fortified Halfaya position on 17 January, taking about 13,800 prisoners.[2]

On 21 January 1942 Rommel launched a surprise counter-attack and drove the Eighth Army back to Gazala, where both sides regrouped. This was followed by the Battle of Gazala at the end of May 1942.
 
RAF-Pilots.jpg


A group of pilots of No. 303 Polish Fighter Squadron RAF during a conversation after returning from a fighter sortie at RAF Leconfield, 24 October 1940.

Left to right - Pilot Officer Bogusław Mierzwa, Pilot Officer Witold "Tolo" Łokuciewski, Pilot Officer Mirosław "Ox" Ferić, Flight Lieutenant John A. Kent "Kentowski" (the CO of 'A' Flight), Flying Officer Bogdan Grzeszczak, Pilot Officer Jan "Donald Duck" Zumbach, Pilot Officer Jerzy Radomski, Flying Officer Zdzisław Henneberg, Sergeant Eugeniusz Szaposznikow.

(Photo source - © IWM (CH 1534)
Devon, Stanley (Flight Lieutenant) (Photographer)
 
Two Australian soldiers of the 21st Battalion stand with a British solider, and their German captors at an undisclosed location behind German Lines along the Somme, c. August 1916.

The two Australians were among 3,868 members of the Australian Imperial Force (AIF) taken prisoner of war on the Western Front during the First World War.

The 21st Battalion AIF lost fifty men as prisoners of war in the costly an unsuccessful attack on the German-occupied Mouquet Farm on 23 August 1916.

73293252_1242806302558393_1006141770360160256_o.jpg


Among them was 26-year-old Private Frank Hallihan, who found himself pinned down by accurate machine-gun fire. His beleaguered platoon became isolated from the rest of the Australian attack, and they were overrun by German troops who had effectively cut off their ability to withdraw.
"We were being fired on from all directions", Hallihan recalled:
"The alarm was given us; we sprang to our guns. The enemy was coming straight at us; their numbers were a company, the bombers leading. We opened fire on them and threw all the bombs that we had left into them. Their officer in charge ordered them to cease fire, and cleared a way for us to pass through; but until we ran out of ammunition we kept up our fire, and they were on us. The officer levelled his revolver on the first of his men who attempted to fire and cleared the way once more. Thinking of our wounded in the dugout, and seeing that we would only murder them by remaining there, we were forced to obey the order of the Hun. Not a second too soon; fifty of us left this place, nearly all more or less wounded… We were put in charge of sentries immediately, and moved on. They flew at us with rifles and anything they could get hold of to take our lives, but we didn’t care then; we were no more use. Although in German hands, we showed we weren’t particular whether dead or alive, but we would stroke back if they struck. It wasn’t long before we were faced with some beauties, and the attention of the officer in charge was drawn to us which caused him to keep a much sharper look out. Otherwise, he would have had to go out and report all prisoners dead."
The story of Australian prisoners of war is arguably more often understood through their internment at the hands of German and Japanese captors in WWII. However, a new book is shedding valuable light on the experiences of Australian prisoners of war during the First World War.
'Surviving the Great War', by Dr Aaron Pegram - a senior historian at the Australian War Memorial and the Memorial’s First World War centenary historian - is the first detailed analysis of the little-known story of Australians in German captivity in the First World War.
And in timely fashion, it's publication at the end of this first centenary year post-Armistice makes it an ideal stocking-filler for Christmas!
A highly recommended read for anyway interested in Australia's involvement in WW1:
https://www.awm.gov.au/shop/item/9781108486194
Image courtesy of the Drakegoodman Collection
 
Happy Thanksgiving!

T/5 William Fleming from Austin, Minnesota, eating a turkey leg. San Benedetto area, Italy. November 1944
78229800_2427578207371957_8674584179746275328_o.jpg

(Photo by Schmidt. 3131 Signal Service Co.)
(Color by Jecinci)

Pvt. Frederick A. Adcock, 107 AAA Group, from 2063 Hatch St., Benton Harbor, Michigan, a Fifth Army infantryman, seems to enjoy his task as he goes to work on a mess kit of thanksgiving chow of which turkey was the main course.
Marcello Pistoiese Area, Italy. 22 November 1944
78121544_2427578380705273_4659136198638305280_o.jpg


Photo by Edwards. 3131 Signal Service Co.' San
(Colourised by Royston Leonard)


Thanksgiving chow went as far forward as there were troops
Sgt. Frank J. Shiborski, from Detroit, Michigan a 50 Cal. Machine gunner with the 107th Anti-Aircraft Artillery Group, takes a break from the fighting to enjoy a Thanksgiving 'drum-stick'. San Marcello Pistoiese Area, Tuscany, Italy. 22 November 1944
77204707_2427578507371927_5835438886729285632_n.jpg

Frank J. Shiborski survived the war. He passed away in September 1982.

(Photo by Edwards. 3131 Signal Service Co, U.S. Army Signal Corps, Gift in Memory of William F. Caddell, Sr., from the collection of The National WWII Museum)
Colour by RJM


Sgt Louis S. Wallace (from Meadville, Miss.), prepares two of the many thousands of turkeys that have arrived from The States, using a M1937 Field Range stove.
78735835_1187584971437551_6600307355953397760_o.jpg

Colour by Jecinci


"After receiving permission from the farm owner, these men, attached to an airbase at Norfolk ,England , invade a turkey pen to choose their annual turkey day repast. The turkeys were given to the men for their Thanksgiving dinners”, November 6, 1943

78332876_1187555134773868_6222973236091551744_o.jpg


Colour by Jecinci
 
Last edited:
Found a few colorized pics from WW1


0000.mc1.jpg


Various duds and fuses
0000.mc2.jpg


French native levies from Senegal


0000.mc3.jpg


Two of the "lucky ones" who made it to a hospital
0000.mc4.jpg


I believe there are Austro-Hungarians in the mountains during the Isonzo campaign
0000.mc5.jpg


German position
0000.mc6.jpg


0000.mc7.jpg


0000.mc8.jpg
 

Similar threads

Back
Top